In this little corner of the world I get lost in creativity; a craft project, an article or just in thought.


Thursday, July 17, 2014

Intimidated By A Santa Stamp


I am truly loving this card. 

First, I was a bit intimidated by this stamped image. As you can see from the pictures below the Image is like a collage. I really had no clue what to do with it. That's probably the reason why it has been in a folder for the last two years.  This stamped Santa image was given to me about two years ago by my mom. I believe it is from a Stampin' Up stamp.

Thanks to one of the most recent challenges on Simon Says Stamp Blog, I pushed myself to come out of my comfort zone. The challenge that they are hosting which inspired me to finally use this Santa image is called About A Face 

Tuesday, July 15, 2014

Gray and White Wedding Card


This Gray and white wedding card is the result of an inspirational card challenge called Sweet Sunday Sketch Challenge. 

The awesome sketch that was provided is shown below. 

Sunday, July 13, 2014

Hot Air Balloon Card


Congratulations on a New Baby Card

This shaped card was inspired by challenge called "Start from scratch challenge" over at Simon Says Stamp Challenge Blog

The base of the card in which the hot air balloon rests was made using water colors on white card stock.

To make the hot air balloon itself, I have made a tutorial on my blog. 

After creating the hot air balloon, it was glued the card base closer to the fold on the left side.

To shape the card, cut around the whole balloon embellishment except on the left side of the balloon where the fold is. 

Here is how the inside looks 

 I like the card but it needs some improvements. Hopefully the next one will take on a little more of a professional looking card.


Sharing this post with:

Saturday, July 12, 2014

Tutorial: Hot Air Balloon Embellishment


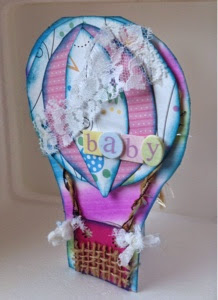
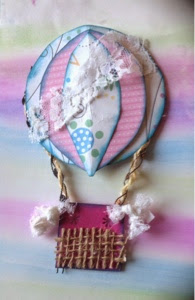
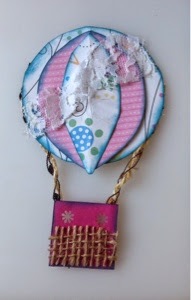
Once you create your own hot air balloon embellishment, you can instantly lift up anyone's spirit by simply adding it to a card front or a scrapbook page.  Create this hot air balloon in just minutes by making use out of your scrap papers. Different colors and patterns will contribute to your balloons uniqueness. The inspiration for this tutorial came from a challenge on Simon Says Stamp Blog.

 
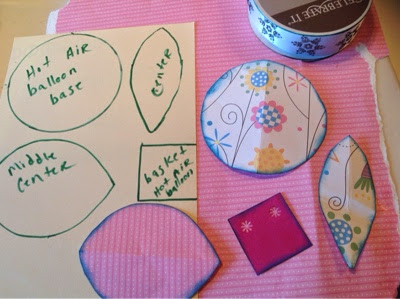
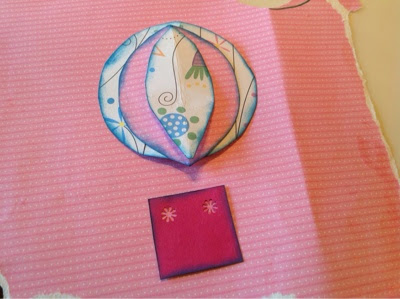
 1.  The main part of the balloon was created by tracing around a spool of ribbon. 
 2.   Cut another main circle then fold it in half. Without disturbing the fold. Trim off some of the     rounded side. This is your middle center piece.
 3.   Trace around your middle center piece, cut out. Fold this cut piece, trim around the curved edges without cutting any of the fold. This is your center piece.
 4.   Cut out a square for the basket. Punch two small decorative holes on top of basket.


 5.   Ink around the edges of each piece.
 6.   Place middle center piece on top of main circle; leaving about 1/4 inch showing of main circle at the top. This will make the middle piece slightly extend over the bottom edge.
 7.   Sit the center piece right in the middle of the middle center piece. The top and bottom points should evenly meet.
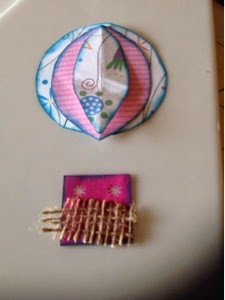
 8. Secure pieces together using paper glue or hot glue gun.


 9.   A small piece of burlap looks great on the bottom of the basket. 


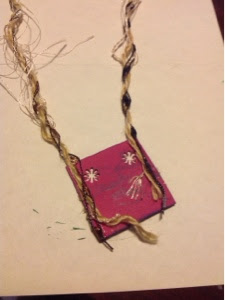
10.   Turn basket so the front is facing down.
11.   Cut 2 equal sizes of yarn or string.
12.   Glue them to the inside edges of the basket along the sides.


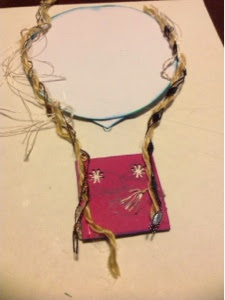
13.   Position the balloon over the basket (facing down).
14.   Secure the yarn ends to the inside sides of the balloon with glue gun as shown in picture.


15.   Attach a piece of lace going diagonally across the balloon.


16.   Knot the end of  two strips of lace.
17.   Cut bottom of strips to your desire.
18.   Glue the knot area to where the basket meets the yarn.


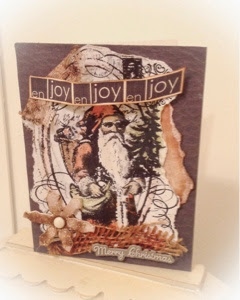
Now it's time to add character to a card or scrapbook page by using your awesome hot air balloon!


This post is being shared with some awesome sites such as:

ItsOverflowing


Thursday, July 10, 2014

Christmas cards in july


These three cards and another one herehave a couple of things in common. Right off the bat, it's obvious they all are Christmas themed. They were all created by inspiration from card challenges online and they all have creative twist paper applied to them.

If you have been a crafter for sometime, you might be having a flashback right about now! This twisted paper became very popular in the 80's. If you have never used this type of paper or not even sure what I'm talking about; just picture crepe paper 20 times it's thickness. However, unlike crepe paper that is not in a twisted state, creative twist is commonly un-twisted before using it to create a project.


Wreaths, bows, and paper dolls are the most popular items made using creative twist paper. You can find this paper in a variety of colors at your local craft store. There are also pattern books with illustrated pictures to make this type of craft more enjoyable! Finding inspiration for using this element is as easy as going to Utube. This beautiful flower tutorial is simple to follow along and will result in a lovely creation!


 This card was inspired by a challenge on Christmas Cards All Year Round blog. The challenge here is to create a card using non traditional holiday colors. 

 Inspiration for this card came from a picture and a requirement of using green and white for the card that was posted on Merry Monday Challenge blog.

 A sketch that was offered at  the Feeling Sketchy blog was the inspiration for this woodsy looking Christmas card. 


perhaps you have been working on a project, why don't you share it with people who love to admire all things crafty at The Craft Frenzy Friday Party!


These cards are also being entered @ :


Linky Parties

Sunday, July 6, 2014

White on White Card Challenge


This wintery white holiday card was created using inspiration from three  different card challenges.

The white on white theme was a requirement for the Merry Monday card challenge  and for the W is White Challenge at Simon Says Stamp Blog.

Inspiration for the card layout is from the Feeling Sketchy challenge blog.

Elements used to make this card: White paper twist, white card stock, white sparkling Thickers to spell "joy", ribbon, white textured foam snowflake


Friday, July 4, 2014

Fast and easy 4th of July wreath


Last Minute Annie is my second name! A good example of that is  well, I just put this up on my front door a few minutes ago!

This wreath base is a grapevine wreath that has been decorated & un-decorated more times than I remember. 

The process was super quick and easy for this patriotic theme.

As I wrapped the burlap around the wreath, simply hold the artificial flowers in place and continue wrapping the burlap over the stems. Pull material nice and snug to hold flowers in position.

Strips of lace were tied onto the left side leaving the ends dangling over the sides.

Lastly, pop some flower heads off their stems and secure them over the lace using a hot glue gun.

In less than 20 minutes your front door will display a festive wreath that is quite unique.

Thursday, July 3, 2014

Red, White and Blue Card

This card is displaying a scripture verse that was provided by Word Art Wednesday Blog last week. Due to the fact that their challenge this week is 'anything goes' I will link this card up as well as the one in my last post.

The card front is made up of different designs from embossing templates. I purchased these templates quite sometime ago made by Darice. They came in a set of three. They're designed for borders. What they are not designed for is: the Cuttlebug. 

Well, one of my favorite sayings is, " when there is a will, there is a way". The combination of using the A and C boards with the templates in between I also needed 5 sheets of card stock to make it nice and snug to ensure the embossing effects. I'm sure this has been done before and I am not alone on this :)

 "Stand fast therefore in the liberty wherewith Christ has made us free, and be not entangled again with the yoke of bondage." 
Galatians 5:1


Finding inspiration in card challenges


     I enjoy using challenges to inspire my creative side. My card making activity has definitely decreased in the last year since I haven't been participating in these awesome challenges. Not only do I enjoy the creative thinking these challenges require but also the feedback from fellow card makers always brings on a smile!
These two cards were derived from the combination of two challenges. The layout of the card was designed by following the sketch on Freshly Made Sketches blog. The Scripture verse on the card was not a mandatory requirement for the challenge on the Word art Wednesday blog.


I was pleased with the 1st card so I figured while the supplies were out the 2nd card would come together quick. Basically they are the same except for a few small details like the size of the font for example.